Your cart is currently empty!
Pre-Printing Activities
The good thing about printing in Excel is that you have several tools to use to assist you:
- Page Setup
- Print Preview
- Page Break Preview
Page Setup
Page Setup consists of the following tabs:
- Page
- Margins
- Header & Footer
- Sheet
The Page Setup dialog box involves a number of options to choose from. It can be opened by a few different places in Excel. One obvious location to open it is by selecting the Ribbon Page Layout tab, Page Setup Group. Select the small downward pointing arrow in the bottom right corner (FIGURE 1).

FIGURE 1
The Page Setup dialog box that appears as a result is shown in FIGURE 2.
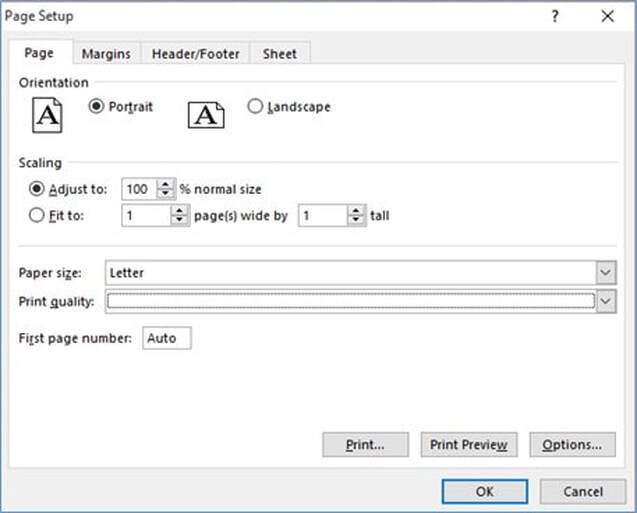
FIGURE 2
In the Scaling section of the Page tab, notice that it’s set for 100% size printing. That means that no scaling is taking place. In other words, there will not be any attempt to reduce the size of the document.
If we were to change the scaling to the other choice and select “Fit to:” 1 page(s) wide by 1 tall, that frequently requires scaling to occur. Since we have now put a condition on it, Excel will shrink the size if necessary to fit everything on one page.
Print Preview
Print preview allows you to look at your document and ascertain whether it is currently ready to be printed the way you want it to. If part of the data is separated from the rest and you want to keep it together, you can fix it by scaling down the size so that it will all fit together; you can even have it printed on one page if you desire.
The Print preview Settings are shown below. Notice that one of the choices is Scaling. When you select Scaling, you’ll see a drop-down menu with various choices (FIGURE 3). One of the choices, Fit Sheet on One Page, shrinks it so that it will all print on one page. This is similar capability to the scaling on Page Setup.
The actual preview of the data is on the right below (FIGURE 4).
 FIGURE 3
|
 FIGURE 4
|
Page Break Preview
Page break preview allows us to see how the document’s current settings affect where the page breaks occur. Not only can we see where the page breaks are, we can also adjust the breaks using our mouse. We can also insert and remove page breaks anywhere on the document.
By having the ability to move the page breaks so that all of the data can fit on one page, we are in essence scaling the document, which is shrinking it to accommodate the new page break locations.
By having the ability to move the page breaks so that all of the data can fit on one page, we are in essence scaling the document, which is shrinking it to accommodate the new page break locations.
Practice Exercise 14: Preparing a workbook for printing using Page Setup, Page Break Preview, and Print Preview.
|
STEP 1: Using the Formulas & AutoFill Table workbook, change to Page Break Preview viewing mode (FIGURE 5). You can select it by selecting the Ribbon View tab, Workbook Views Group. You can also select it down on the end of the Status Bar. It is the icon on the right.
|
 FIGURE 5
|
STEP 2: Notice that our worksheet does not quite fit on one page (FIGURE 6). The dotted line indicates an automatic page break. That break is based on factors such as our margin settings, header and footer size, column widths, font size, and other subtle factors. Go into Page Setup, Page tab, and change the Scaling from Adjust to 100% to Fit to 1 page wide by 1 tall.
|
STEP 3: Notice that the automatic page break has been moved due to the scaling that occurred when we selected the scaling change to 1 page wide by 1 page tall (FIGURE 6).
|
 FIGURE 6
|
|
STEP 4A: Go back into Page Setup, Page tab, and in Scaling section, select Adjust to 100%.
We want to insert a page break so rows 1-5 are on page 1 and the remaining rows are on page 2. Click on the row 6 header to highlight row 6. Right click row 6 and select Insert Page Break from the shortcut menu (FIGURE 7). STEP 4B: We have inserted a page break so rows 1-5 are on page 1. |
 FIGURE 7
|
STEP 5: Select row 6 again and right button mouse click and select reset all breaks. |
Page break has been removed. |
|
STEP 6: Go into Page Setup, Sheet tab. We will set up a print area. In the print area space, enter A1:F5.
For Rows to repeat at top space, enter A1:F1. For Columns to repeat at left, enter A2:A5 (FIGURE 8). |
 FIGURE 8
|
STEP 7: Go into Print Preview by selecting it from the Quick Access Toolbar. If it’s not on the toolbar, add it. Print Preview shows that print area was set up properly as reflected by cells on preview (FIGURE 9 and FIGURE 10). |
 FIGURE 9
|

FIGURE 10
Module 5 completed. Take quiz for Module 5 here.
After Module 5 quiz is completed, begin course exam here